

What is the AI Inbox?
The AI Inbox is your central workspace for reviewing all proposed actions from proactive agents. Think of it as a smart drafts folder where the AI prepares messages for you to review and approve before anything reaches your customers. Key difference from AI Conversations:- AI Inbox — Outbound messages proposed by agents for you to review (you → customer).
- AI Conversations — Inbound conversations your customers have with the AI assistant (customer ↔ AI).
How to Access
- In the Dashboard navigation, go to Operations → AI Assistant → AI Inbox.
- Or use the direct link.
Understanding the Inbox Interface
Metrics Bar
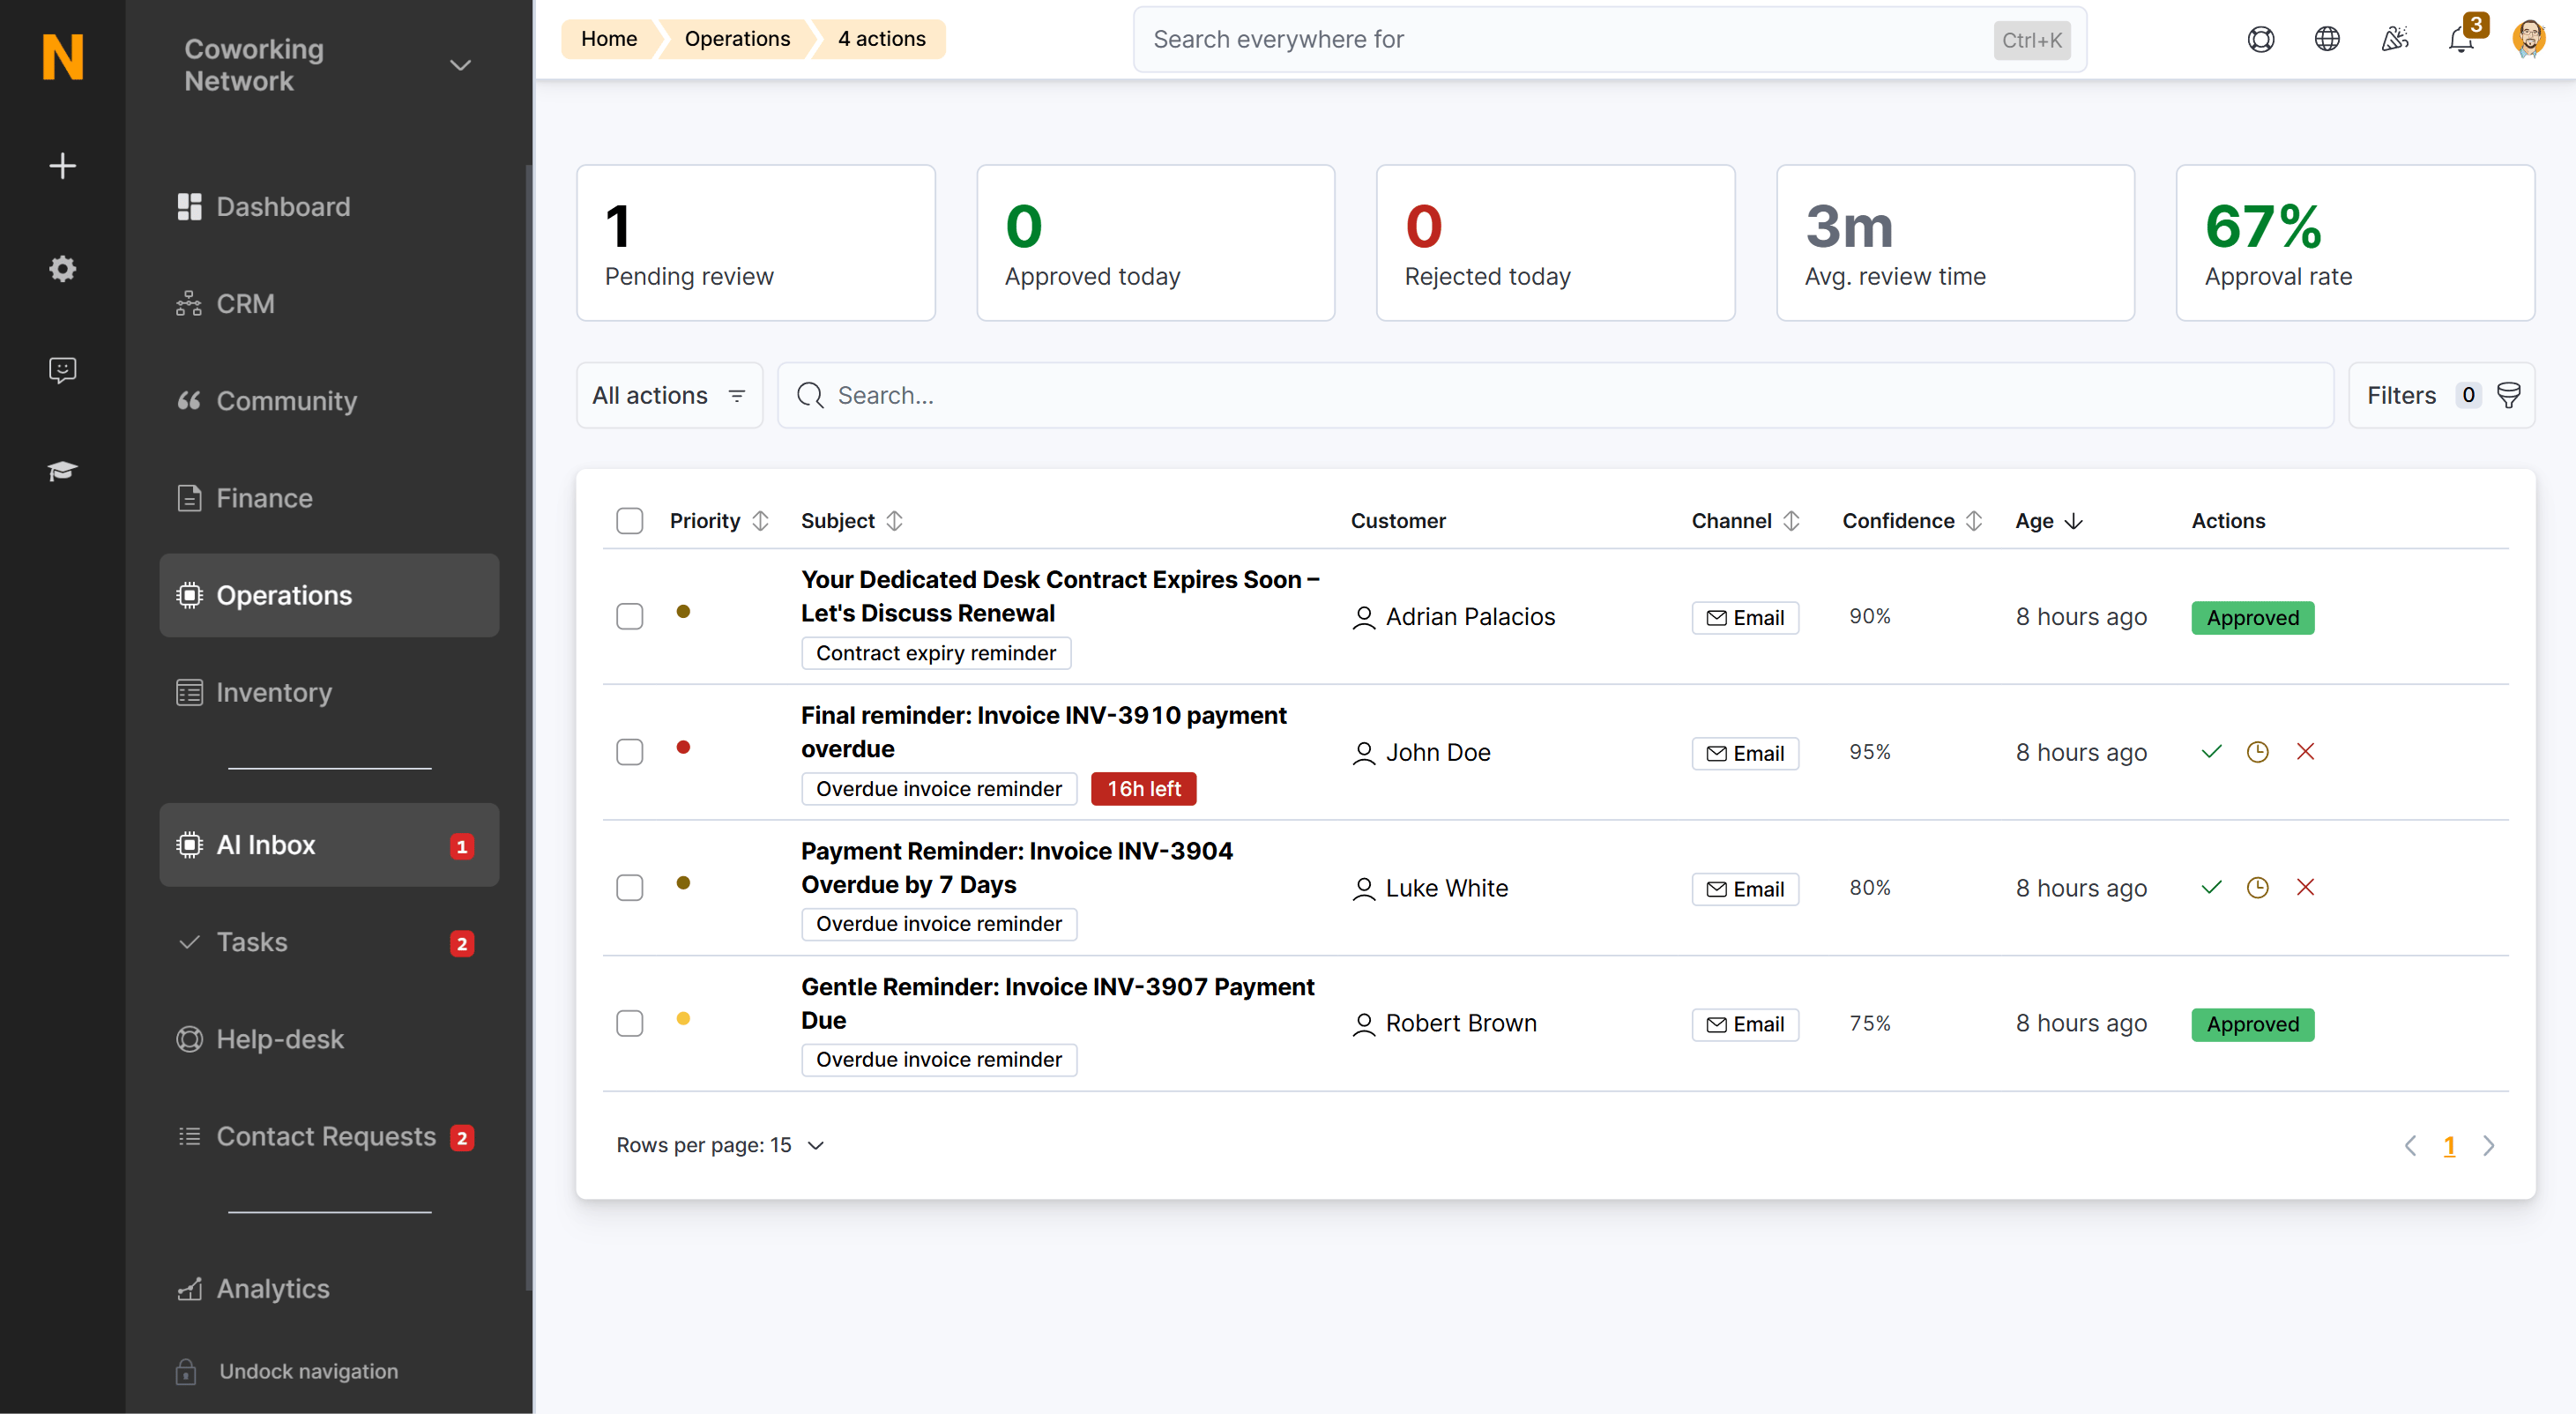
At the top of the inbox you’ll see five key metrics at a glance:
These metrics update automatically as you process actions. Click the Pending review, Approved today, or Rejected today tile to filter the list to matching items; click it again to clear the filter.
Action List
The main list shows one row per proposed action. Each row displays:Status Badges
Filtering and Segments
Quick filter tabs at the top let you jump between predefined segments:
You can refine the view further with the filter controls:
- Criteria type — Show only actions from a specific agent.
- Customer — Filter by customer name.
- Priority — Show only specific urgency levels.
- Channel — AI Email, Email Message, WhatsApp, Voice, or Help Desk.
- Status and Action type — Narrow by state or kind of action.
- Confidence — Filter by score.
- Created / Expires — Filter by date range.
Sorting
Click the Priority, Subject, Channel, Confidence, or Age column header to sort ascending or descending. The default sort is Age (newest first).Inline Row Actions
Pending and snoozed rows offer quick-action icons directly in the list — no need to open the detail panel:- ✓ Approve — Sends the message as drafted (after a confirmation prompt). Use for obvious, low-risk items.
- ⏰ Snooze — Opens the snooze duration menu.
- ✕ Reject — Dismisses the action (after a confirmation prompt).
Empty States
When the pending queue is clear, you’ll see a friendly 🎉 All caught up! message explaining that new AI-proposed actions will appear here when they need your attention, with a link to configure your AI agents.Taking Action on Proposed Items
Click any row in the inbox to open the action detail panel. The panel is split into two sections: Context & History on the left, and the Message Draft on the right.Left Panel — Context & History
This section helps you understand why the action was proposed:- Customer information — Full name, company, and customer type (Member, Contact, or Lead), with a link to the full customer profile.
- Why this was proposed — The agent name, the trigger criteria (e.g., “Invoice #1234 is 5 days overdue. Customer has good payment history but missed this payment.”), and supporting data like amounts and dates.
- Related activity — Messages already exchanged with this customer and any support tickets raised from the same conversation, so you can see the full picture before deciding.
- Reviewed by — Who acted on the action and when, once it has been processed.
Right Panel — Message Draft
The draft consists of a Subject line and a Message body, both editable directly in the panel while the action is Pending. Once the action has been approved, rejected, or expired, the fields are locked for viewing. Below the draft you choose the Delivery channel — how the message reaches the customer:- Email — Standard email to the customer’s address.
- WhatsApp — Requires the customer to have messaged your location within the last 24 hours; otherwise a pre-approved opt-in template is sent first.
- Voice — An AI voice call. Only sent during business hours; if approved outside those hours, the action is automatically deferred until the next available window.
- In-app message — Delivered through the member portal. You can optionally pick a connected email account to send from, which enables reply tracking.
- Support ticket — Creates a help desk ticket instead of contacting the customer. You can assign a department, set a priority, and add internal notes visible to your team only.
Three Ways to Respond
Every proposed action gives you three options:✅ Approve & Send
Use when the message is accurate, the tone matches your brand, and no changes are needed.- Review the message and customer context.
- Click Approve & Send.
- Confirm in the modal.
✏️ Edit the Message
The subject line and message body are editable directly in the detail panel — there is no separate edit mode. Use this when the message is good but needs minor tweaks or a personal touch.- Click into the Subject or Message body field and make your changes.
- Choose the delivery channel described in the Right Panel section above.
- Click Approve & Send and confirm.
❌ Reject
Use when the action isn’t appropriate — the issue is already resolved, the timing is wrong, or you’d prefer to handle it personally.- (Optional) Add review notes in the text area at the bottom — these are internal notes for your team, not sent to the customer.
- Click Reject.
- Confirm in the modal.
Structured rejection reasons are planned for a future release. For now, use the review notes field to explain why you rejected an action.
⏰ Snooze
Use when you’re not ready to decide right now but want the action to come back automatically.- Click Snooze.
- Select a duration from the menu:
- 1 hour
- 4 hours
- 24 hours
- 3 days
- 1 week
Working Through Multiple Actions
Each row carries its own Approve, Snooze, and Reject buttons, so you can triage straight from the list without opening every item. Selection checkboxes are also available on each row for marking items. Best practice: Reserve inline approval for obvious, low-risk items (e.g., routine payment reminders). Anything that needs a closer look — or an edit — deserves the full detail panel with customer context.Introduction Screen
When you first open the AI Inbox, you’ll see an introduction screen that explains the workflow:Your AI assistant continuously monitors your space and identifies opportunities to engage with customers — from payment reminders to lead follow-ups. Each proposed action appears here for your review and approval before anything is sent. You can edit messages, approve them as-is, or dismiss them. Over time, you can enable auto-execution for specific action types you trust.The screen also notes that the AI assistant is currently in beta (OpenAI is the current subprocessor for AI models; access is free during the beta phase, though pricing may change later), and offers links to learn about AI agents or configure them. Click Go to AI Inbox to dismiss it and access the inbox list.
Action History
To review past actions:- Switch to the Approved or Rejected segment.
- Click any action to see:
- The message that was sent (or the review notes you added when rejecting)
- Reviewed by and Reviewed on — who took the action and when
- Any messages exchanged with the customer afterwards, and any support tickets raised from the same conversation
Related Pages
- Proactive Agents — How agents work and how to access the configuration page.
- Configuring Agents — Step-by-step guide to enabling and customizing individual agents.
- Agent Types Reference — Detailed reference for all available agents.
- AI Conversations — Two-way conversations with customers, including replies to approved actions.